Manager
Product information can be found at CaseTalk Manager
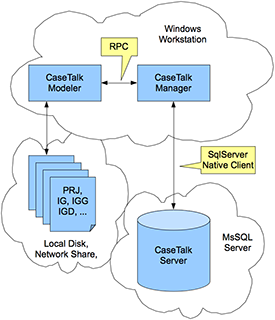
The Manager is our product which enables multi-model storage for multi-user access through a versioned storage using a centralized database. The following product architecture is in place to enable this:
Using the CaseTalk Modeler you can build your information models as always. The files are all stored as local files on your disk or share. These models are to be shared and managed among other users in your business. For this the Manager communicates with the Modeler. Both programs are Windows client software and need to run in the same Windows client. The CaseTalk Server is actually a SQL Server Database which contains all models, diagrams, versions, and user registrations.
First time
When starting the CaseTalk Manager for the first time, you are presented with a dialog to enter the database connection settings (Manager:3/DbConfig). Also a first user account is requested which will be marked as a system account (Manager:3/UserEdit).
Users and members
New user accounts can be added and once projects are stored using the manager, these users can be promoted to become project members.
Member Roles
Users may be the owner of a project they checked in themselves. They are enabled to add additional users as project members. Also the system accounts are able to perform this action. Once a user account is added as a project member, they can be set to a specific role within this project: Owner, Modeler, Guest. The owner as said can manage the project and the membership. The Modeler can checkout the models, and check them back in. Guests are only able to checkout the models and cannot check them back in.
Exchanging files
After having started the CaseTalk Modeler you should start the CaseTalk Manager and authenticate. The CaseTalk Manager will show a toolbar button pressed, indicating it is connected through RPC with the Modeler to exchange projects and files.
Manage Project
A new project created with the Modeler should be selected in it's project window. After which the popup menu can be selected to click the menu "Manager Project...". This activates the Manager to either open a project with the same name, or show a property dialog within the Manager to edit the project settings.
Manage Model
Once a project has been checked in at least once, the Modeler allows checking in the IG and the files associated with it (IGD, IGG, SQL etc..). Please select the IG file and navigate to the project window manager button, and choose one of the following:
- Add: Adding the saved IG and all associated files
- Commit: Commit the changes of the IG and it's associated files
- Update: Update the local working project with updates stored previously using the Manager.
All IG files checked out from the Manager contain a link which enables them to keep a reference to the origin. This link to the Manager may be removed by selecting:
- Unlink
