Modeler: Tutorial/Editing Information Grammar
In this lesson you will learn how to change information grammars. (Using the information grammar you have created in the previous lessons).
Renaming an object/fact type
Step 10
1. Click on 'Student' in the Repository window.
2. Open 'Student's' popup-menu and select Rename (or press F2).
3. Overwrite 'Student' with 'Apprentice' and press Enter.
4. Open the Edit menu and select Undo Rename 'Student' (or press Ctrl+U).
Removing an object/fact type
Step 10
1. Click on 'Apprenticeship' in the IG Viewer.
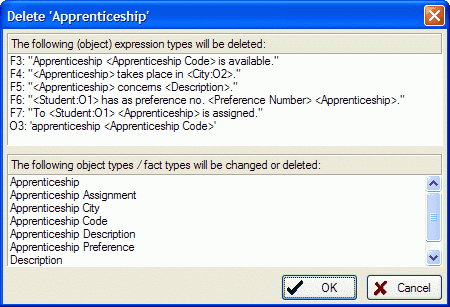
2. Select Delete from it's popup-menu (do not press OK after that!):
The fact types 'Apprenticeship Description', 'Apprenticeship City', 'Assigned Apprenticeship' and 'Apprenticeship Preference' contain roles played by 'Apprenticeship'. By deleting 'Apprenticeship' these roles would become obsolete. Therefore these fact types will be removed along with 'Apprenticeship'. By removing these fact types the label type description becomes useless... etc. Nearly the complete information grammar would be removed.
3. Click Cancel to prevent the deletion of 'Apprenticeship'!
Changing the properties of an object/fact type
Step 10
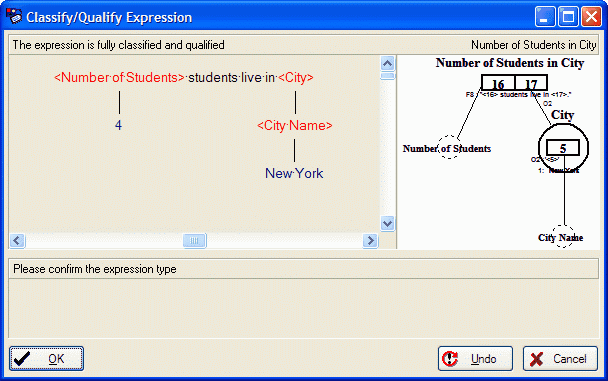
1. Classify and qualify the fact expression: '4 students live in New York' as shown below:
2. Select the fact type 'Number of students in city' in the IG Viewer.
3. Select Edit from it's popup-menu and click 'Derivable': You could supply the derivation rule in the comment.
4. Click Roles:
5. Select role 17.
6. Type 'in city' in the Column Fix field.
7. Select Columnfix Type 'Postfix' and close both windows by clicking Ok.
8. Drag 'Number of students in city' from the Repository window onto the diagram.
Note: The fact type is marked derivable with an * behind the fact type name. Role 17 has a postfix.
9. Open the Edit menu and select Undo twice. The 'Number of students in city' should now have disappeared.
Changing the properties of a label type
Step 10
1. Doubleclick on 'Preference number' in the Diagram.
This will select it in the Repository window. Use the context menu to edit it.
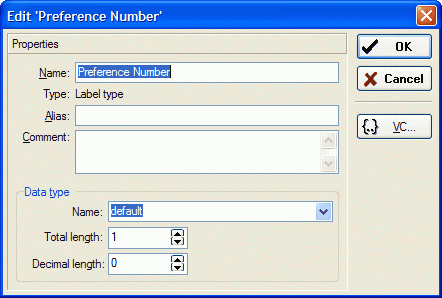
2. Select Edit from it's popup-menu:
You can adjust the datatype and value constraint in this window.
3. Click VC and enter the value constraint displayed below:
Note: Once you have a proper population the examples from this can be automatically inserted as value constraints using the populate button.
Reducing an object type
Step 11
1. Click on 'City' in the Repository window.
2. Select Reduce from it's popup-menu.
Note: Roles 4 and 8 are now played by 'city name' and 'City' has been removed.
3. Click on 'city name' in the diagram.
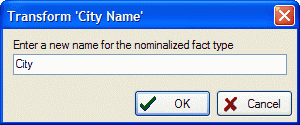
4. Select IG Tasks, Transform to Nominalized Fact Type from 'city names' popup-menu (In the Diagram Designer). Enter 'City' as the new object type name:
Note: A totality constraint has been placed on roles 4 and 8. A unicity constraint has been placed on the role of 'City'.
The result will look like this:
The Transform to Nominalized Fact Type option is also available from the Repository window popup-menu. If you would have choosen this option, the object 'City' would not have been placed automatically on the diagram.
Changing an object/fact type expression
Step 12
1. Make sure the right section of the Repository window is visible and the OTL tab is activated.
2. Click on 'City' in the IG Viewer.
3. Click on object type expression O4 (in the right section).
4. Select Edit from the popup-menu of O4.
5. Change O4 als shown below:
Note: All fact type expressions in which O4 is substituted will change when regenerated.
Replacing an object type expression
Adding population to a fact type (expression)
Using expression files
Changing the population of a fact type (expression)
Regenerating fact (type) expressions
[Category:Modeler]


