Model Navigation
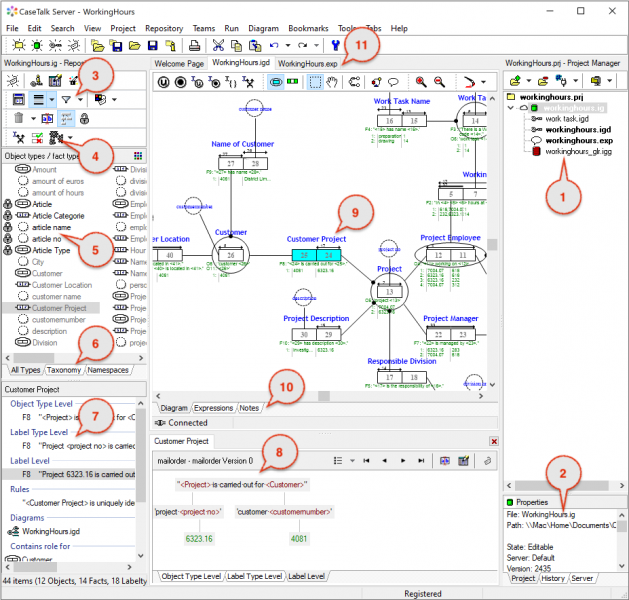
With any large model, and becomes even larger, navigating the quantity of it can become an issue. CaseTalk offers many navigation paths to enable you to quickly jump to related aspects. This screenprint shows an overview and describes how to perform these navigational tasks.
Project File & Properties
The models and diagrams are managed with the Project Panel (1). It shows all files related and a special panel with file details (2). Files are activated by doubleclicking them. Models are displayed on the left, while all other files will open as tabs (11).
Object & Fact Types
Model content (*.ig) or transformed model content (*.igg) is listed as Object/Fact Types in the panel on the left (5). Buttons indicated with (3) are used for highlighting and filtering. Using the highlight the displayed items are shown differently. The filtering options allow certain items to be shown or hidden.
Taxonomy & Namespaces
The Object Types can be part of a subtype-supertype relationship. This is called a taxonomy. This taxonomy is a different way of listing object types, and can be navigated by opening the bottom tab (6).
Since Object and Fact Types may originate from other models, listing which are local and which are from a different namespace, the last tab lists those. Selecting a namespace will filter the relevant information in panel (7).
Expressions, Population and Rules
The verbalisations lead to the Object and Fact Types. So by selecting an Object/Fact Type the details of that item show up in a bottom panel (7). The double clicking of an expression will open panel (8) the full expression tree.
Scrolling this panel will show all kinds of verbalizations, rules and attributes. Some are again supporting navigation by doubleclicks.
Diagram & Styles
Object and Fact Types can be dragged into a diagram (9) to be visualized graphically. Doubleclicking any item in the diagram will navigate towards the selected item in the list.
Using the context menu on any item in the Diagram will allow to add related items, or navigate cross diagrams and model to related items.
Project History
If the Tool Options are set to create archives, the project history (2) can be navigated at the History tab. Adding a new archive, or extracting it entirely or partially is done by the context menus and archive buttons.
Teams Server
Since CaseTalk supports Teams with a central repository to store all versions and models, the Server Panel gives users the ability to view the model as stored in various versions. Using that tab (2) in combination with the Teams Menu, users can upload and download various models and versions.
Transformations
The strongest feature on CaseTalk is the ability to transform models for artifact generation (4). The IG file content is transformed into a new model and stored in a IGG file. Before that happens the model is validated for well-formedness. The result of that validation will be shown in a special panel at location (8). Once the transformation is successful the resulting artifacts will be added to the Project Panel and can be viewed by doubleclicking those files.
