Difference between revisions of "Modeler:Tutorial/Using the plugin modules"
(Created page with "In this lesson you will learn how to use the Plug-In Modules. Plug-In Modules are separately available extensions to the casetool. = Generating SQL'92 compliant code = '''St...") |
|||
| (2 intermediate revisions by the same user not shown) | |||
| Line 1: | Line 1: | ||
In this lesson you will learn how to use the Plug-In Modules. Plug-In Modules are separately available extensions to the casetool. | In this lesson you will learn how to use the Plug-In Modules. Plug-In Modules are separately available extensions to the casetool. | ||
= | = Using the SQLite plugin = | ||
Casetalk comes with lots of plugins to export you model to various artifacts, such as database compliant code. | |||
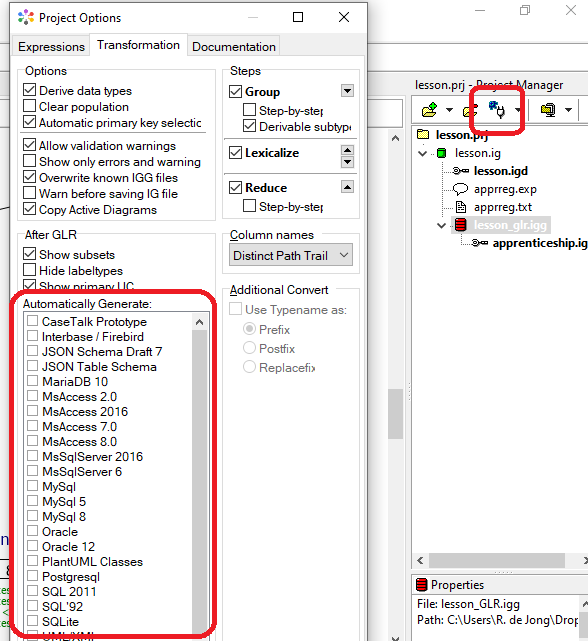
1. | 1. Select 'Settings'' from the ''Run'' menu. A list of different database types is shown which can be called automatically after a model transformation. Or you may select one while an IGG is active using the plugin button at the project manager: | ||
[[File:Plugins. | [[File:Plugins.png]] | ||
2. Select the | 2. Check SQLite in the list and click OK | ||
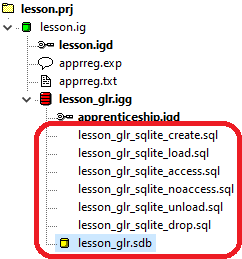
3. Select Transform from the Run menu. A serie of SQL-scripts is created in the Project Manager and also the SQL Information Grammar: | |||
[[File:SQLiteFiles.png]] | |||
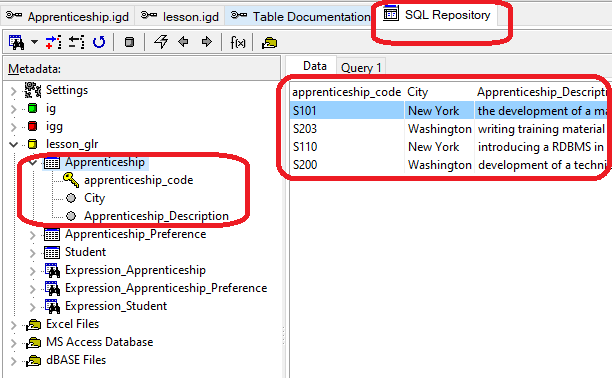
4. Double click on the '''lesson_glr.sdb'''. A new tab appears with the database information and tables. | |||
5. Click on the ''Apprenticeship'' table. The table data is shown on the right. Clicking on the arrow next to the ''Apprenticeship'' table shows the primary key (''apprenticeship_code'') from that table: | |||
[[File:Dbstruct.png]] | |||
6. Click on ''Expression_Apprenticeship''. The expressions concerning the ''Apprenticeship'' are shown on the right. Of course, the created SQLite files can be found in the project folder. | |||
[[ | Note that this means that not only a database is created, but all communication is still available as well. | ||
[[ | ---- | ||
Back: [[:Modeler:Tutorial/Deriving a Database Schema|Deriving a Database Schema]] | |||
Next: [[:Modeler:Tutorial/Subtype and Generalisation|Subtype and Generalisation]] | |||
[[Category:Modeler]] | [[Category:Modeler]] | ||
Latest revision as of 05:21, 24 March 2021
In this lesson you will learn how to use the Plug-In Modules. Plug-In Modules are separately available extensions to the casetool.
Using the SQLite plugin
Casetalk comes with lots of plugins to export you model to various artifacts, such as database compliant code.
1. Select 'Settings from the Run menu. A list of different database types is shown which can be called automatically after a model transformation. Or you may select one while an IGG is active using the plugin button at the project manager:
2. Check SQLite in the list and click OK
3. Select Transform from the Run menu. A serie of SQL-scripts is created in the Project Manager and also the SQL Information Grammar:
4. Double click on the lesson_glr.sdb. A new tab appears with the database information and tables.
5. Click on the Apprenticeship table. The table data is shown on the right. Clicking on the arrow next to the Apprenticeship table shows the primary key (apprenticeship_code) from that table:
6. Click on Expression_Apprenticeship. The expressions concerning the Apprenticeship are shown on the right. Of course, the created SQLite files can be found in the project folder.
Note that this means that not only a database is created, but all communication is still available as well.


