Difference between revisions of "Modeler:Tutorial/Deriving a Database Schema"
| (10 intermediate revisions by the same user not shown) | |||
| Line 70: | Line 70: | ||
= Setting grouping marks before grouping = | = Setting grouping marks before grouping = | ||
1. Open the diagram. | |||
2. Right click on the fact type Apprenticeship Assignment. | |||
3. Choose Task, Edit from the pop up menu | |||
4. Click on the Role button in the window that appears. | |||
5. Select role 14 and set the grouping to ''Don’t group'': | |||
[[File:Glrgroupoverride.png]] | |||
6. Repeat this for role 15. | |||
[[File:Glrgroupoverride. | |||
By unchecking roles 14 and 15 you have indicated you do not want to group these roles. | By unchecking roles 14 and 15 you have indicated you do not want to group these roles. | ||
7. Open the ''Run'' menu and select ''Settings''. Make sure all options are set as displayed on the right. | |||
[[File:GlrNonStepped.png]] | |||
Note: Do not check Step-by-step grouping. The Step-by-step grouping algorithm ignores the User Override property. | |||
[[File: | 9. Open the ''Run'' menu and select ''Transform''. | ||
10. If this window appears, select ''YES'': | |||
[[File:ConfirmGlrSettings.png]] | |||
11. Save the new diagram as '''Apprenticeship.igd'''. | |||
The generated information grammar is not in Optimal Normal Form (ONF). This structure might be choosen if ''Assigned Apprenticeship'' is unknown for most of the students. (Grouping ''Assigned Apprenticeship'' then results in a ''Student'' table with too many NULL values in the ''Assigned Apprenticeship'' column). | |||
'' | [[File:Glrgrouped2.png]] | ||
12. Rightclick on the '''lesson_glr.igg''' in the project manager and choose ''Remove from project''. Confirm with Yes and save the project by choosing Save All from the File menu. | |||
= Deriving a proposal = | |||
1. Open the ''Run'' menu and check ''Proposal''. | |||
The elements in the diagram will show with ''G'', ''L'' and ''R'' indicators. | |||
[[File:Glrlexicalizeproposal.png]] | |||
3. Uncheck the menu item ''Proposal'' to hide the indicators again. | |||
= | = Choosing a Primary Key = | ||
When ‘Automatic primary key selection’ is active and no primary UC is marked, Casetalk chooses a primary key based on the role with the lowest number. For instance, the fact type ‘Apprenticeship Assignment’ has two separate UC’s on role 14 and 15. So Casetalk chooses role 14. When this option is disabled, the user kan choose the primary key. | |||
1. Reactivate the ''IG Model'' and select the ''Run >> Settings'' menu. | |||
2. Disable the option ''Automatic Primary Key Selection'', and click OK. | |||
2. | |||
3. Open the menu ''Run'' and select ''Transform''. | |||
4. In the appearing ''Primary Key Editor'' you can select which uniqueness constraint should be taken as primary key. | |||
[[File:Glrpkedit.png]] | |||
5. In the left section a list of fact types with multiple uniqueness constraints is displayed. Below this list you will find a the list with the uniqueness constraints of the selected fact type. Each of the uniqueness constraints in this list can be checked. In the right section the selected fact type is displayed . | |||
6. Choose UC 13 for ''Apprenticeship Preference'', so that the primary key is created using roles 11.1, 11.2 and 12. | |||
= Reducing = | = Reducing = | ||
1. Select the | 1. Select Settings from the Run menu. | ||
2. Select only the option ''Step by Step'' as seen on the below: | |||
[[File:Glrreducestepbystep.png]] | |||
3. Click OK. | |||
4. Open the ''Run'' menu en select ''Transform''. | |||
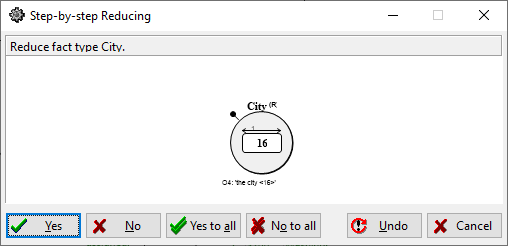
5. The ''step-by-step'' window appears: | |||
[[File:Glrreducestepbystep2.png]] | |||
6. Click Yes to all to reduce everything. | |||
7. Save the new diagram as '''lesson_r.igd'''. | |||
8. Rightclick on '''lesson_r.igg''' at the Project Manager on the right, remove it from the project. Confrm with Yes. | |||
9. Open the File menu and select Save All to save the project. | |||
= Generating Table Documentation = | = Generating Table Documentation = | ||
1. Open the Run menu and select Settings. | |||
2. Derive data types: | |||
If this option is selected the casetool will derive a datatype proposal during the GLR process. CaseTalk will generate Char and Numeric datatypes. If you have entered other datatypes they will not be affected by this option. If you have used Char and Numeric yourself and the casetool has detected labels exceeding the total and/or decimal length you have specified these attributes will be updated. | |||
If the option ''Derive data types'' is not checked, check it. | |||
3. Clear Population: | |||
If this option is selected, all population will be removed during the GLR process. | |||
Leave this option unchecked for now. | |||
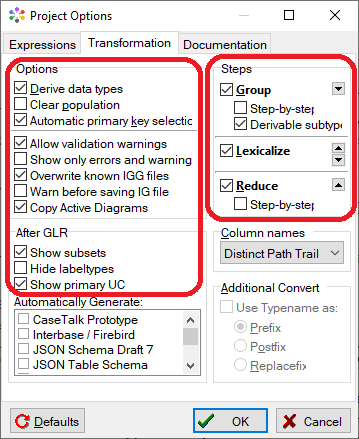
4. Make sure the settings in this window are like this: | |||
[[File:Projectoptionsglr. | [[File:Projectoptionsglr.png]] | ||
5. Click OK. | |||
6. Select Transform from the Run menu. | |||
The information grammar will now be grouped, lexicalized and reduced. | |||
7. Save the new diagram as ‘Apprenticeship.igd’ | |||
8. Select ‘Apprenticeship Preference from the repository. | |||
9. Open the View menu and select Table Report. | |||
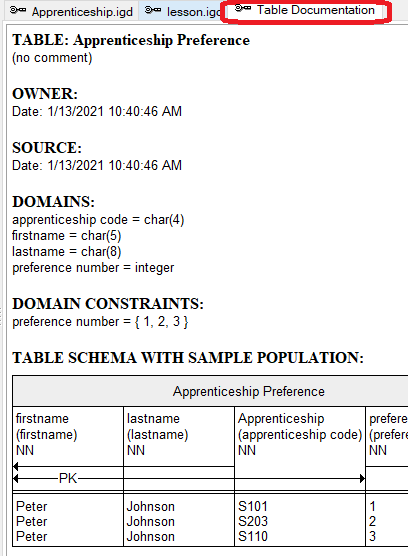
10. A new tab will appear containing the table documentation for 'Apprenticeship Preference': | |||
[[File:Tabledocumentation.png]] | |||
11. Keep the Table Documentation tab open and select another fact type from the Repository window. The contents of the Table Documentation tab might not change automatically. If so, adjust the tab window a bit. | |||
12. Close the Table Documentation tab. | |||
13. Open the File menu and select Save All. | |||
You can print the table documentation by selection Print Table Documentation from the file menu. | |||
---- | ---- | ||
Latest revision as of 05:14, 24 March 2021
In this lesson you will learn how to check the integrity of an information grammar and how to derive a database schema.
Checking the integrity of an information grammar
Preparation
1. Open the Run menu and select Settings.
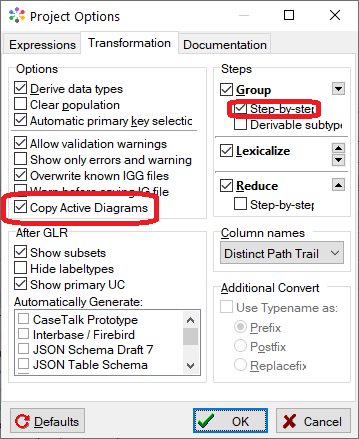
2. Check Copy Active Diagrams and Step by Step and make sure the other settings are as shown below:
3. Click OK.
Note: Some CaseTalk versions didn't pick up the settings until restarted and the project is reopened.
Verify well-formedness
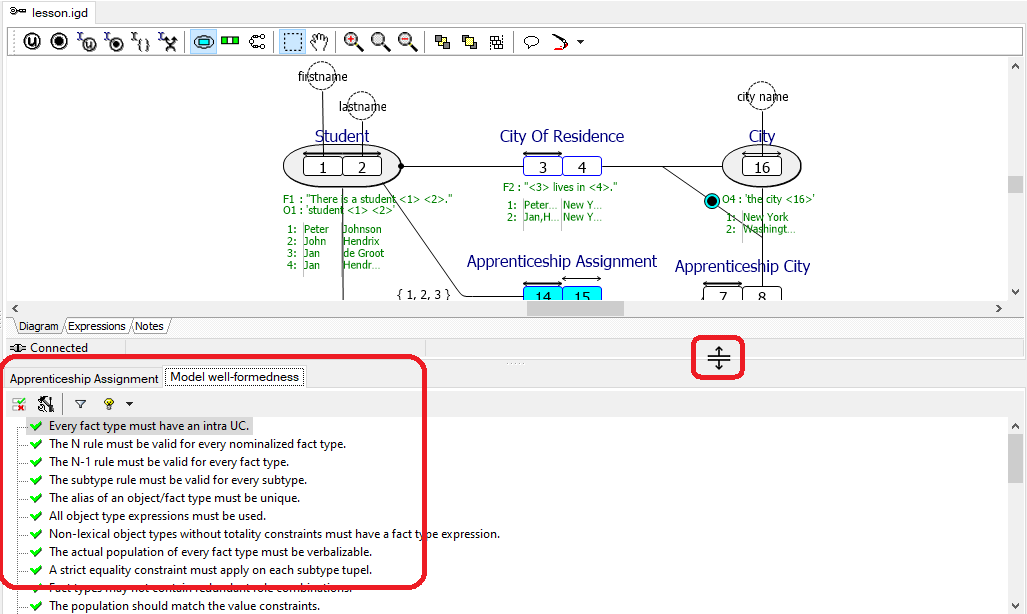
1. Click menu Run, Verify well-formednes.. Casetalk automatically performs a model Integrity Check. If the casetool encounters any errors the Integrity Check window will be opened so you can examine the error. If Integrity Check encounters only warnings, the Integrity Check window will not be opened.
2. After the Integrity Check, the result is visible below the diagram. You can change the window-size for a better view.
A detailed description of the checks can be found in appendix B.
Step-by-step grouping
Step by step grouping is hardly used in daily practice because of the large number of roles that are present in most models. The following steps are only for the purpose of education and understanding the grouping process using a small model.
1. Open the Run menu and select Transform
2. Casetalk automatically transforms the model. After a while, this window appears:
3. Click yes.
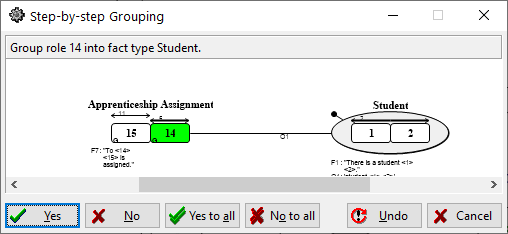
4. CaseTalk now shows this window:
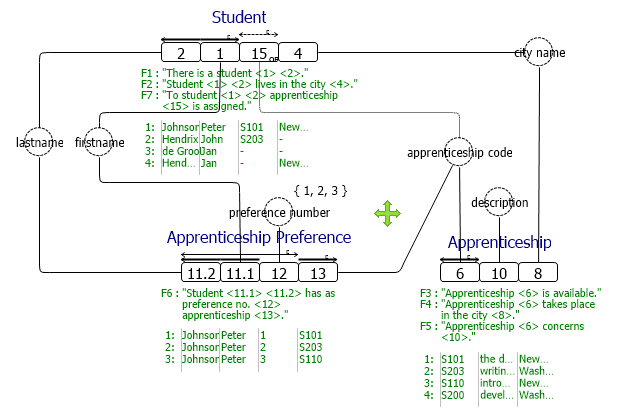
Since there are two separate UC’s on role 14 and 15, CaseTalk has to decide how to group these roles, and it proposes to group role 14 into the fact type Student.
5. Click Yes.
Casetalk shows the next proposal. You can click Yes for each separate proposals, or click Yes to all to approve all following proposals. 6. Casetalk now shows a window to save your transformed model:
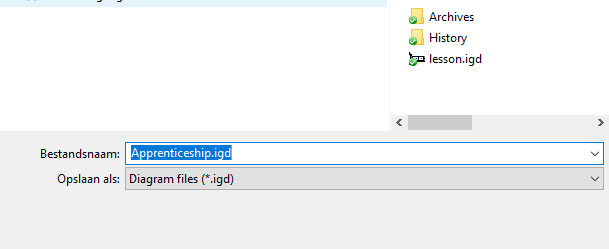
7. Save the transformed diagram as Apprenticeship.igd.
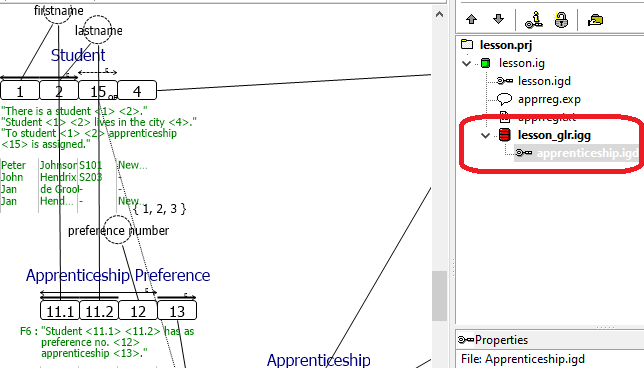
The project manager on the right now shows the grouped grammar and diagram:
For the purpose of this tutorial, we’re going to rerun the transformation with other settings, so delete the two files that you’ve just created:
8. Rightclick on lesson_glr.igg and choose Remove from project. Confirm with Yes and notice that the grouped diagram is also deleted.
Note: if the repository-window on the left has suddenly disappeared, double click on the green IG-icon on the projectmanager:
9. Save the project by selecting Save All from the File menu.
Setting grouping marks before grouping
1. Open the diagram.
2. Right click on the fact type Apprenticeship Assignment.
3. Choose Task, Edit from the pop up menu
4. Click on the Role button in the window that appears.
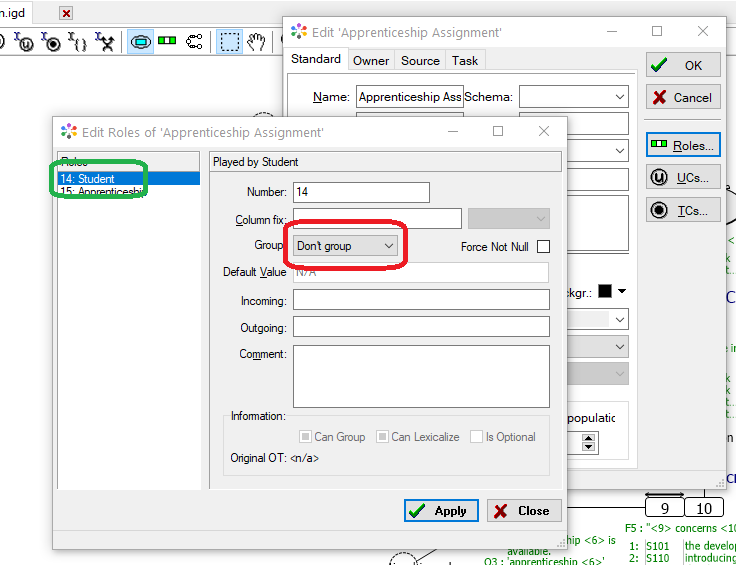
5. Select role 14 and set the grouping to Don’t group:
6. Repeat this for role 15.
By unchecking roles 14 and 15 you have indicated you do not want to group these roles.
7. Open the Run menu and select Settings. Make sure all options are set as displayed on the right.
Note: Do not check Step-by-step grouping. The Step-by-step grouping algorithm ignores the User Override property.
9. Open the Run menu and select Transform.
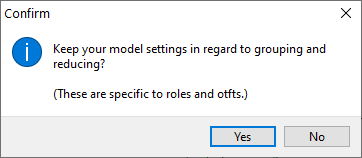
10. If this window appears, select YES:
11. Save the new diagram as Apprenticeship.igd.
The generated information grammar is not in Optimal Normal Form (ONF). This structure might be choosen if Assigned Apprenticeship is unknown for most of the students. (Grouping Assigned Apprenticeship then results in a Student table with too many NULL values in the Assigned Apprenticeship column).
12. Rightclick on the lesson_glr.igg in the project manager and choose Remove from project. Confirm with Yes and save the project by choosing Save All from the File menu.
Deriving a proposal
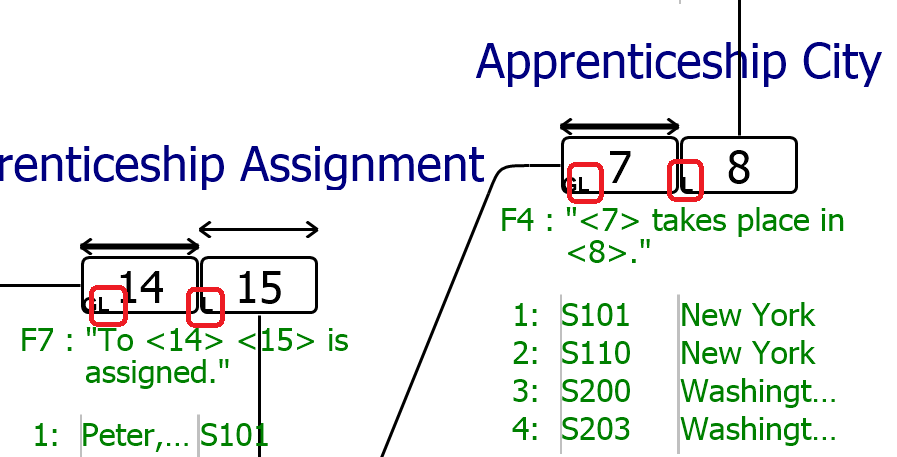
1. Open the Run menu and check Proposal.
The elements in the diagram will show with G, L and R indicators.
3. Uncheck the menu item Proposal to hide the indicators again.
Choosing a Primary Key
When ‘Automatic primary key selection’ is active and no primary UC is marked, Casetalk chooses a primary key based on the role with the lowest number. For instance, the fact type ‘Apprenticeship Assignment’ has two separate UC’s on role 14 and 15. So Casetalk chooses role 14. When this option is disabled, the user kan choose the primary key.
1. Reactivate the IG Model and select the Run >> Settings menu.
2. Disable the option Automatic Primary Key Selection, and click OK.
3. Open the menu Run and select Transform.
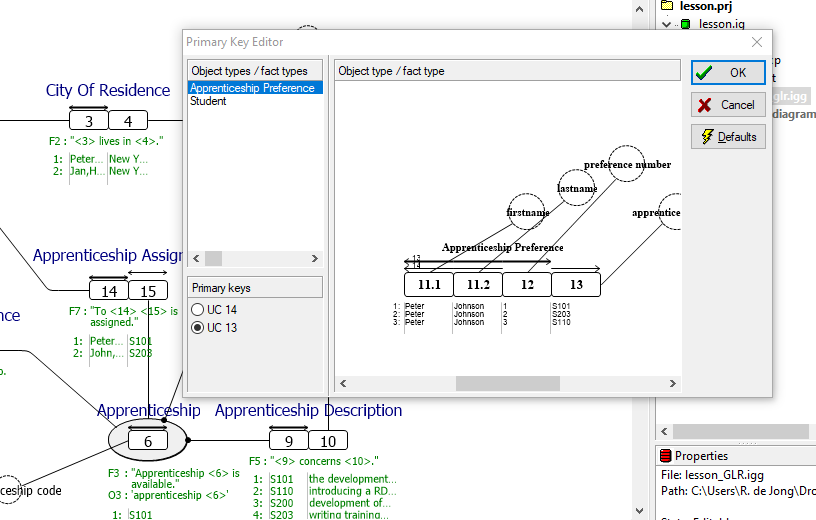
4. In the appearing Primary Key Editor you can select which uniqueness constraint should be taken as primary key.
5. In the left section a list of fact types with multiple uniqueness constraints is displayed. Below this list you will find a the list with the uniqueness constraints of the selected fact type. Each of the uniqueness constraints in this list can be checked. In the right section the selected fact type is displayed .
6. Choose UC 13 for Apprenticeship Preference, so that the primary key is created using roles 11.1, 11.2 and 12.
Reducing
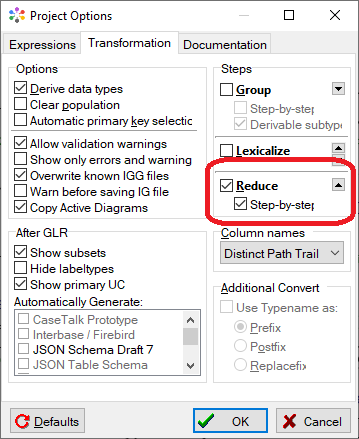
1. Select Settings from the Run menu.
2. Select only the option Step by Step as seen on the below:
3. Click OK.
4. Open the Run menu en select Transform.
5. The step-by-step window appears:
6. Click Yes to all to reduce everything.
7. Save the new diagram as lesson_r.igd.
8. Rightclick on lesson_r.igg at the Project Manager on the right, remove it from the project. Confrm with Yes.
9. Open the File menu and select Save All to save the project.
Generating Table Documentation
1. Open the Run menu and select Settings.
2. Derive data types: If this option is selected the casetool will derive a datatype proposal during the GLR process. CaseTalk will generate Char and Numeric datatypes. If you have entered other datatypes they will not be affected by this option. If you have used Char and Numeric yourself and the casetool has detected labels exceeding the total and/or decimal length you have specified these attributes will be updated. If the option Derive data types is not checked, check it.
3. Clear Population: If this option is selected, all population will be removed during the GLR process. Leave this option unchecked for now.
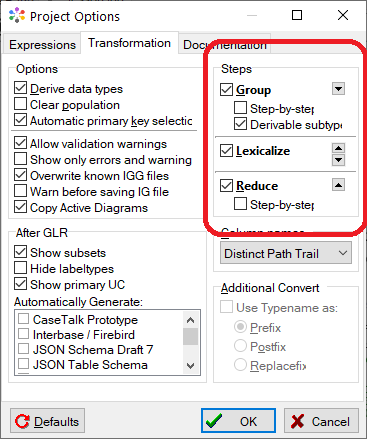
4. Make sure the settings in this window are like this:
5. Click OK.
6. Select Transform from the Run menu. The information grammar will now be grouped, lexicalized and reduced.
7. Save the new diagram as ‘Apprenticeship.igd’
8. Select ‘Apprenticeship Preference from the repository.
9. Open the View menu and select Table Report.
10. A new tab will appear containing the table documentation for 'Apprenticeship Preference':
11. Keep the Table Documentation tab open and select another fact type from the Repository window. The contents of the Table Documentation tab might not change automatically. If so, adjust the tab window a bit.
12. Close the Table Documentation tab.
13. Open the File menu and select Save All.
You can print the table documentation by selection Print Table Documentation from the file menu.
Back: Constraints
Next: Using the plugin modules
