Difference between revisions of "Modeler:Tutorial/Constraints"
| (11 intermediate revisions by the same user not shown) | |||
| Line 3: | Line 3: | ||
The constraints you are adding will not be applied to the population. As a result it is posible to add population that violates the constraints in the information grammar. | The constraints you are adding will not be applied to the population. As a result it is posible to add population that violates the constraints in the information grammar. | ||
= Adding | = Adding uniqueness constraints (UC) = | ||
1. Open the Diagram. | 1. Open the Diagram. | ||
2. Click on 'Student' in the Diagram | 2. Click on ''Student'' in the Diagram, then click on the UC button. | ||
[[File:IgdUc.png]] | |||
Notice the double arrow above role 1 and 2. | |||
[[File:IgdUcStudent.png]] | |||
3. Repeat step 2 to add the uniqueness constraint to ''Apprenticeship''. | |||
4. Hold the Ctrl-key, and select role 3 and click the UC button. | |||
''Note: You may select multiple roles also using the multiple role button from the diagram toolbar.'' | |||
[[File:Multiroleselect.png]] | |||
'' | 5. Repeat step 4 to add the UC to role 14. | ||
After adding the UC, you must deselect that role before adding a new UC to another role. | |||
6. Repeat step 4 to add the UC to role 15. | |||
7. Repeat step 4 to add the UC to role 7. | |||
8. Repeat step 4 to add the UC to role 9. | |||
9. Hold the Ctrl-key, select both roles 11 and 12 and add the UC. | |||
10. Repeat steps 8 and 9 to add the UC to role combination 11 + 13. | |||
The UC's in your diagram should look like this: | |||
[[File:Igdwithucs.png]] | |||
= Removing a uniqueness constraint = | |||
You can always remove a UC. Suppose the UC on role 15 is wrong. | |||
1. Make sure the button ''select objects/facts'' is selected: | |||
[[File:SelectOT.png]] | |||
2. Right click on the role from which you want to remove the UC. | |||
In this case, right click on role 15. | |||
3. In the pop up menu, select Task, Delete Constraint. If there are multiple constraints that can be removed, all are shown: | |||
[[File:DeleteConstraint.png]] | |||
4. Click on the constrait you want to remove. In this case, the UC on Rol 15. | |||
5. The UC on role 15 wasn’t wrong, so add the UC on role 15 again. (Or use Undo.) | |||
= Adding totality constraints (TC) = | |||
1. Hold the Ctrl-key, select role 3 and click on the TC button in the diagram menu: | |||
[[File:TCConstraint.png]] | |||
Notice the small dot at the corresponding object type, showing you the TC on role 3 (not role 2!): | |||
2. Repeat step 1 to add totality constraints to the seperate roles 7 and 9. | |||
[[File: | [[File:Igdwithtcs.png]] | ||
= Remove a totality constraint = | |||
The procedure to remove a TC is the same as for removing a UC. | |||
= Removing and adding inter fact type constraints = | |||
== Removing == | |||
1. Select inter fact type totality constraint 1. | |||
2. Select Delete from its popup-menu. | |||
[[File:DeleteInterTC.png]] | |||
== Adding == | |||
1. Select both roles 4 and 8 and click on the TC button n the diagram menu. Click OK to confirm. | |||
= Adding comment to constraints = | |||
1. Select the fact type ''City of Residence''. | |||
2. Right click and choose Task, Edit from the pop up menu. | |||
3. Click on the UC Button. | |||
[[File:Edituc.png]] | |||
You can now enter your comment for the constraints related to ''City of Residence''. | |||
This comment will be displayed in the Fact Type Documentation. | |||
4. Close the window. | |||
''Note: In a similar way you can add comment to uniqueness constraints and value constraints.'' | |||
= Adding | = Adding subset constraints (SC) = | ||
''' | 1. Select the menu ''Repository >> Subset Constraints' | ||
2. Click Add. | |||
3. Select ''Apprenticeship Assignment'' to fill the 'From element'' and click OK. | |||
4. Select ''Apprenticeship Preference'' from the ''To dropdown box'': | |||
[[File:Subseteditor.png]] | |||
[[File: | CaseTalk proposes a list of possible candidates for role 14 and 15: | ||
[[File:SubseteditorRoles.png]] | |||
5. Erase the pair for role 14 by selecting ''-''. | |||
[[File:SubseteditorRoles2.png]] | |||
6. Click OK. | |||
7. To show the subset constraint description text, open the Diagram menu and select Show Subset Constraint Info. The constraint info is now visible on the canvas and can be dragged around: | |||
[[File:SubsetConstraintInIgd.png]] | |||
If the infobox shows no constraints (‘none’), click F5 to refresh. | |||
8. Open the Edit menu and select Undo SC Editor. | |||
9. Select Hide from the popup-menu of the Subset Constraints Info box. | |||
10. Save the project by selecting Save All from the File menu. | |||
---- | |||
Back: [[:Modeler:Tutorial/Editing Information Grammar|Editing Information Grammar]] | |||
Next: [[:Modeler:Tutorial/Deriving a Database Schema|Deriving a Database Schema]] | |||
[[Category:Modeler]] | [[Category:Modeler]] | ||
Latest revision as of 04:18, 24 March 2021
In this lesson you will learn how to add constraints to the information grammar using the Diagram Designer.
The constraints you are adding will not be applied to the population. As a result it is posible to add population that violates the constraints in the information grammar.
Adding uniqueness constraints (UC)
1. Open the Diagram.
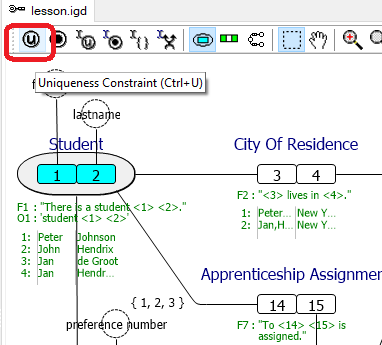
2. Click on Student in the Diagram, then click on the UC button.
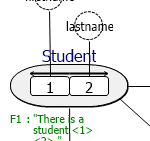
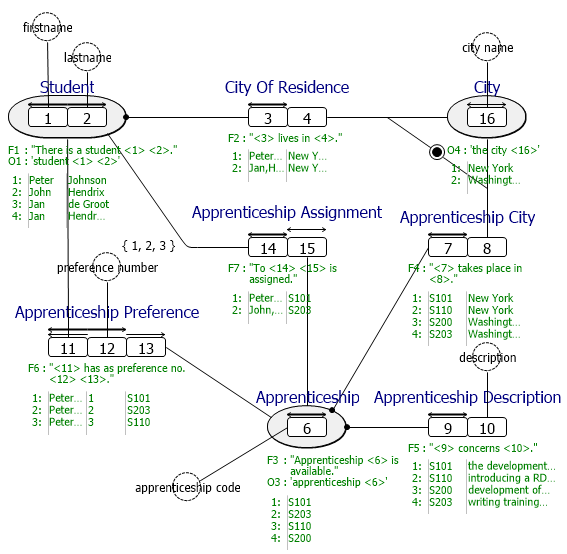
Notice the double arrow above role 1 and 2.
3. Repeat step 2 to add the uniqueness constraint to Apprenticeship.
4. Hold the Ctrl-key, and select role 3 and click the UC button.
Note: You may select multiple roles also using the multiple role button from the diagram toolbar.
5. Repeat step 4 to add the UC to role 14. After adding the UC, you must deselect that role before adding a new UC to another role.
6. Repeat step 4 to add the UC to role 15.
7. Repeat step 4 to add the UC to role 7.
8. Repeat step 4 to add the UC to role 9.
9. Hold the Ctrl-key, select both roles 11 and 12 and add the UC.
10. Repeat steps 8 and 9 to add the UC to role combination 11 + 13.
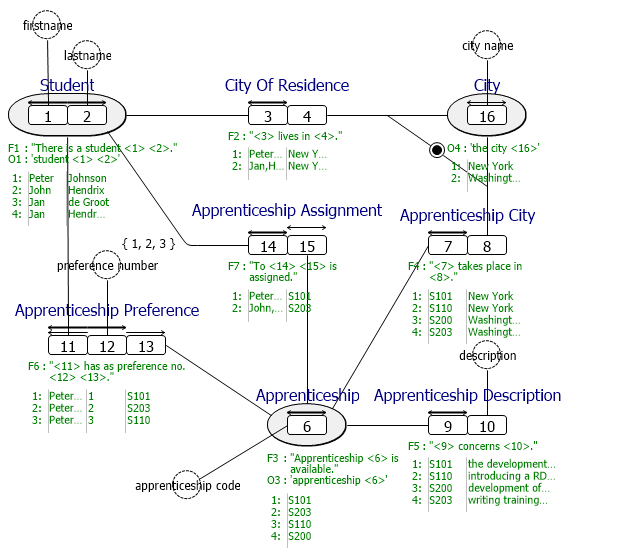
The UC's in your diagram should look like this:
Removing a uniqueness constraint
You can always remove a UC. Suppose the UC on role 15 is wrong.
1. Make sure the button select objects/facts is selected:
2. Right click on the role from which you want to remove the UC. In this case, right click on role 15.
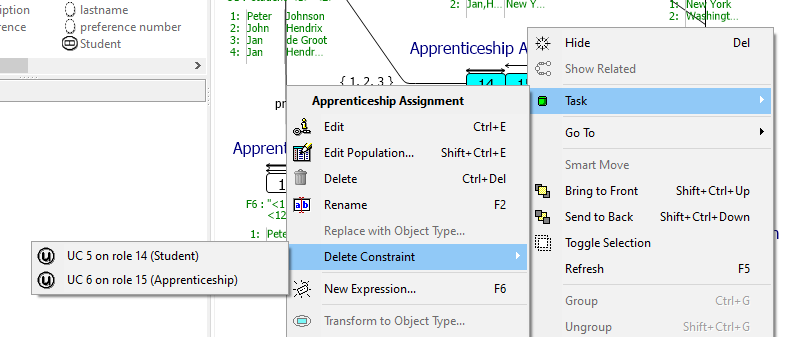
3. In the pop up menu, select Task, Delete Constraint. If there are multiple constraints that can be removed, all are shown:
4. Click on the constrait you want to remove. In this case, the UC on Rol 15.
5. The UC on role 15 wasn’t wrong, so add the UC on role 15 again. (Or use Undo.)
Adding totality constraints (TC)
1. Hold the Ctrl-key, select role 3 and click on the TC button in the diagram menu:
Notice the small dot at the corresponding object type, showing you the TC on role 3 (not role 2!):
2. Repeat step 1 to add totality constraints to the seperate roles 7 and 9.
Remove a totality constraint
The procedure to remove a TC is the same as for removing a UC.
Removing and adding inter fact type constraints
Removing
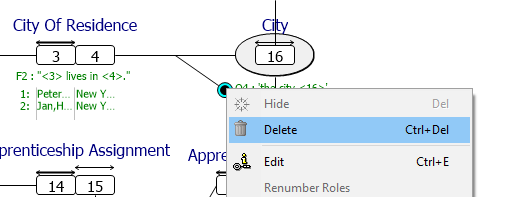
1. Select inter fact type totality constraint 1.
2. Select Delete from its popup-menu.
Adding
1. Select both roles 4 and 8 and click on the TC button n the diagram menu. Click OK to confirm.
Adding comment to constraints
1. Select the fact type City of Residence.
2. Right click and choose Task, Edit from the pop up menu.
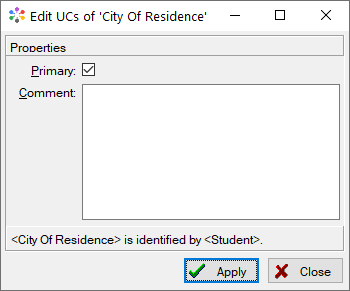
3. Click on the UC Button.
You can now enter your comment for the constraints related to City of Residence. This comment will be displayed in the Fact Type Documentation.
4. Close the window.
Note: In a similar way you can add comment to uniqueness constraints and value constraints.
Adding subset constraints (SC)
1. Select the menu Repository >> Subset Constraints'
2. Click Add.
3. Select Apprenticeship Assignment to fill the 'From element and click OK.
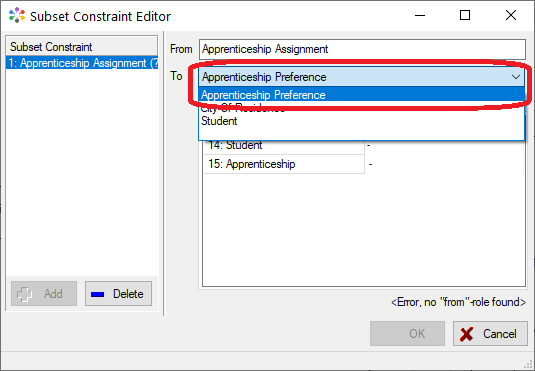
4. Select Apprenticeship Preference from the To dropdown box:
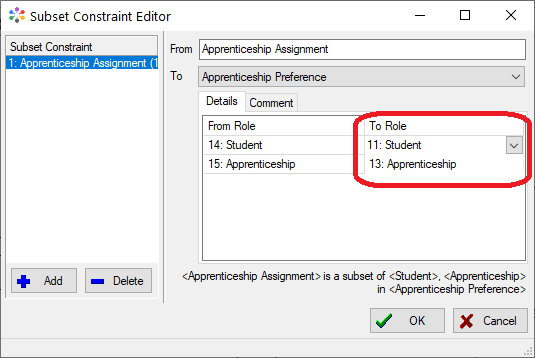
CaseTalk proposes a list of possible candidates for role 14 and 15:
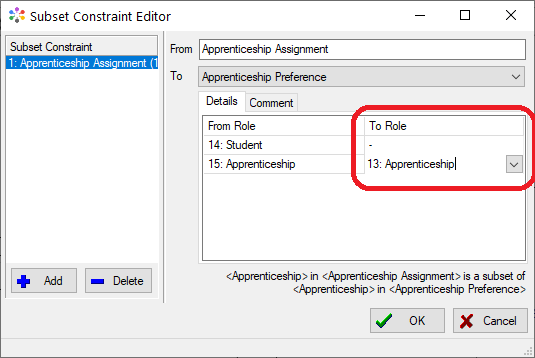
5. Erase the pair for role 14 by selecting -.
6. Click OK.
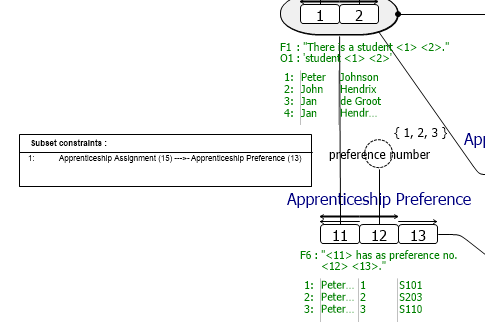
7. To show the subset constraint description text, open the Diagram menu and select Show Subset Constraint Info. The constraint info is now visible on the canvas and can be dragged around:
If the infobox shows no constraints (‘none’), click F5 to refresh.
8. Open the Edit menu and select Undo SC Editor.
9. Select Hide from the popup-menu of the Subset Constraints Info box.
10. Save the project by selecting Save All from the File menu.
