Difference between revisions of "Modeler:Tutorial/Editing Information Grammar"
m |
|||
| (20 intermediate revisions by 2 users not shown) | |||
| Line 1: | Line 1: | ||
In this lesson you will learn how to change information grammars. (Using the information grammar you have created in the previous lessons). | In this lesson you will learn how to change information grammars. (Using the information grammar you have created in the previous lessons). | ||
= Renaming an object/fact type = | = Renaming an object/fact type = | ||
1. Click on ''Student'' in the Repository window. | |||
1. Click on 'Student' in the Repository window. | |||
2. Open 'Student's' popup-menu and select Rename (or press F2). | 2. Open ''Student''s' popup-menu and select Rename (or press F2). | ||
3. Overwrite 'Student' with 'Apprentice' and press Enter. | 3. Overwrite ''Student'' with ''Apprentice'' and press Enter. | ||
[[File:Renamestudent. | [[File:Renamestudent.png]] | ||
4. Open the Edit menu and select Undo Rename 'Student' (or press Ctrl+ | 4. Open the Edit menu and select Undo Rename ''Student'' (or press Ctrl+Z). | ||
= Removing an object/fact type = | = Removing an object/fact type = | ||
1. Click on ''Apprenticeship'' in a Diagram. | |||
1. Click on 'Apprenticeship' in | |||
2. Select Delete from it's popup-menu (do not press OK after that!): | 2. Select ''Task''\''Delete'' from it's popup-menu (do not press OK after that!): | ||
[[File:Deleteapprenticeship. | [[File:Deleteapprenticeship.png]] | ||
The fact types 'Apprenticeship Description', 'Apprenticeship City', 'Assigned Apprenticeship' and 'Apprenticeship Preference' contain roles played by 'Apprenticeship'. By deleting 'Apprenticeship' these roles would become obsolete. Therefore these fact types will be removed along with 'Apprenticeship'. By removing these fact types the label type description becomes useless... etc. Nearly the complete information grammar would be removed. | The fact types ''Apprenticeship Description'', ''Apprenticeship City'', ''Assigned Apprenticeship'' and ''Apprenticeship Preference'' contain roles played by ''Apprenticeship''. By deleting ''Apprenticeship'' these roles would become obsolete. Therefore, these fact types will be removed along with ''Apprenticeship''. By removing these fact types the label type description becomes useless... etc. Nearly the complete information grammar would be removed. | ||
3. Click Cancel to prevent the deletion of 'Apprenticeship'! | 3. Click Cancel to prevent the deletion of ''Apprenticeship''! | ||
A similar ''Delete'' from the IG Repository would prompt a different and more fine grained popup-menu. It'll allow you to delete a single expression either locally or the entire expression grammar, or the entire Object/Fact-Type. | |||
= Changing the properties of an object/fact type = | = Changing the properties of an object/fact type = | ||
1. Classify and qualify the fact expression: ''4 students live in New York'' as shown below: | |||
1. Classify and qualify the fact expression: '4 students live in New York' as shown below: | |||
[[File:Studentsincity. | [[File:Studentsincity.png]] | ||
2. Select the fact type 'Number of students in city' in the IG | 2. Select the fact type ''Number of students in city'' in the IG Repository. | ||
3. Select Edit from | 3. Select Edit from its popup-menu and click ''Derivable'': | ||
You could supply the derivation rule in the comment. | You could supply the derivation rule in the comment. | ||
[[File:Editstudentsincity. | [[File:Editstudentsincity.png]] | ||
4. Click Roles: | 4. Click Roles: | ||
| Line 48: | Line 44: | ||
5. Select role 17. | 5. Select role 17. | ||
6. Type 'in city' in the Column Fix field. | 6. Type ''in city'' in the Column Fix field. | ||
[[File: | [[File:EditstudentsincityRoles.png]] | ||
7. Select Columnfix Type 'Postfix' and close both windows by clicking | 7. Select Columnfix Type ''Postfix'' and close both windows by clicking ''Apply'' and ''OK''. | ||
8. Drag 'Number of students in city' from the Repository window onto the diagram. | 8. Drag ''Number of students in city'' from the Repository window onto the diagram. | ||
Note: The fact type is marked derivable with an * behind the fact type name. Role 17 has a postfix. | Note: The fact type is marked derivable with an * behind the fact type name. Role 17 has a postfix. | ||
9. Open the Edit menu and select Undo twice. | 9. Open the Edit menu and select Undo twice. | ||
The 'Number of students in city' should now have disappeared. | The ''Number of students in city'' should now have disappeared. If not, delete the Fact Type manually. | ||
= Changing the properties of a label type = | = Changing the properties of a label type = | ||
'' | 1. Doubleclick on ''Preference number'' in the Diagram. This will select it in the Repository window. Use the context menu to edit it. | ||
2. Select Edit from it's popup-menu: | |||
[[File:Editnumber.png]] | |||
[[File:Editnumber. | |||
You can adjust the datatype and value constraint in this window. | You can adjust the datatype and value constraint in this window. | ||
| Line 77: | Line 69: | ||
3. Click VC and enter the value constraint displayed below: | 3. Click VC and enter the value constraint displayed below: | ||
[[File:Editvcnumber. | [[File:Editvcnumber.png]] | ||
''Note: Once you have a proper population the examples from this can be automatically inserted as value constraints using the populate button.'' | ''Note: Once you have a proper population the examples from this can be automatically inserted as value constraints using the populate button.'' | ||
4. Click ''OK''. The diagram should reflect the changes. If not, refresh the diagram by pressing Refresh (''F5''). | |||
[[File:VCinDiagram.png]] | |||
= Reducing an object type = | = Reducing an object type = | ||
''' | 1. Click on ''City'' in the Repository window. | ||
2. Select ''Reduce Object Type'' from it's popup-menu. | |||
[[File:Transformcityname.png]] | |||
Note: Roles 4 and 8 are now played by ''city name'' and ''City'' has been removed. | |||
3. Click on ''city name'' in the diagram. | |||
4. Select ''Task >> Transform to Object Type'' from ''city names'' popup-menu: | |||
[[File:TransformToOT.png]] | |||
5. Enter 'City' as the new object type name: | |||
[[File:EnterCityName.png]] | |||
6. If not visible, drag the OT ''City'' into the diagram. The result looks like this: | |||
[[File:CityAfterTransform.png]] | |||
Note: A totality constraint has been placed on roles 4 and 8 (black dot). A uniqueness constraint has been placed on the role of ''City'' (double arrow). | |||
2. Select | The Transform to Nominalized Fact Type option is also available from the Repository window popup-menu. If you would have chosen this option, the object 'City' would not have been placed automatically on the diagram. | ||
= Changing an object/fact type expression = | |||
1. Make sure the right section of the Repository window is visible and the OTL tab is activated. | |||
2. Click on ''City'' in the IG Repository. | |||
3. Click on object type expression O4 (in the right section). | |||
4. Select Edit from the popup-menu of O4. | |||
5. Change O4 als shown below: | |||
[[File:Editexpressioncity.png]] | |||
Note: | ''Note: All fact type expressions in which O4 is substituted will change when regenerated.'' | ||
E.g.: the Fact Type ''City Of Residence'': | |||
[[File:CityOfResidenceExp.png]] | |||
= Replacing an object type expression = | |||
1. Open the Repository menu and select New Expression. | |||
2. Make sure Create OTE is enabled. | |||
[[File:OteEnabled.png]] | |||
3. Enter the object expression ''student Johnson, Peter'' and qualify this expression as ''Student''. Click No Match! | |||
[[File:NoMatch.png]] | |||
4. Classify and qualify ''firstname'' and ''lastname'': | |||
[[File: | [[File:Newstudentexpression.png]] | ||
5. Click on ''Student'' in the Repository window. Click on object type expression O1 in the right section of the Repository (the Object Type Level). | |||
6. Select Replace from the popup-menu of O1. | |||
[[File:ReplaceOTE.png]] | |||
Select O5 from the appearing window: | |||
[[File: | [[File:Replacestudentot.png]] | ||
7. Verify the replacement of O1 by examining the expressions of ''Apprenticeship Preference'' at the Label Type level. | |||
[[File:ReplacedOTE.png]] | |||
8. Open the Edit menu and select ''Undo Replace O1''. | |||
9. Repeat this for ''Undo New Expression: student Johnson, Peter''. | |||
= Adding population to a fact type (expression) = | |||
1. | 1. Click on ''Assigned Apprenticeship'' in the IG Repository, then click on fact type expression F7. | ||
3. Select ''Edit Population'' from the popup-menu. Click Add and add the tuple shown below: | |||
[[File:Editpopulation.png]] | |||
5. Click Ok. | |||
Note: Population has been added to ''Student'', ''Apprenticeship'' and ''Assigned Apprenticeship''. | |||
= Using expression files = | |||
1. Open the File menu and select Open, then open the file '''...\CASETALK\LESSONS\STEPS\LESSON.EXP'''. | |||
2. Open the File menu and select Save Expression File as. Save the file as '''...\APPRREG\APPRREG.EXP''' | |||
== The structure of expression files == | |||
An expression file is a text file. The first line of an expression file contains the text [EXPFILE]. After this line the names of the object type or fact type are placed between []. Below this line you will find the expressions for this object type or fact type. These lines are followed by the second object type or fact type etc. Comment lines can be added by starting the line with a ';'. | |||
It is possible to select multiple lines of an expression file at the same time (for classification and qualification by the casetool). CaseTalk will try to classify and qualify the expressions using automatic matching if possible. As a result the user interaction will be minimized. | |||
3. Click on the first line of the expression file. Hold the shift-key and press the end-key. | |||
4. Click ''Qualify''. | |||
[[File:ExpFileQualify.png]] | |||
''' | CaseTalk will start to classify and qualify the selected expressions. The automatic classification and qualification will stop at the fact expression ''There is a student Jan de Groot'' (Which is a Dutch student). | ||
5. Click Match: | |||
CaseTalk has stopped automatic classification and qualification because it cannot determine whether the ''first name'' is ''Jan'' or ''Jan de''. It suggest the fact expression matches with ''Student'': | |||
[[File:Studentjandegroot.png]] | |||
6. Click ''Extend''. | |||
As a result the ''first name'' would become ''Jan de''. | |||
7. Click ''Extend'' again. | |||
Now the ''first name'' will be ''Jan'' again, which is correct. | |||
8. Click Match and Finish. | |||
[[File: | The automatic classification and qualification will continue. It will stop again for the fact expressions of ''Apprenticeship Preference''. You can just match these expressions and continue. The diagram will now list multiple tuples for each object type / fact type. | ||
To configure the displayed number of tuples, alter the maximum displayed in the Diagram Style Properties: | |||
[[File:MaxTuples.png]] | |||
= Changing the population of a fact type (expression) = | |||
1. Click on ''Apprenticeship Description'' in the IG Repository, then click on fact type expression F5 and select Edit Population from the popup-menu. Click on the tupel with apprenticeship 'S200'. Alter the line in place, or use the ''Form'' tab to use a regular data-entry format. | |||
[[File:Correctpopulation.png]] | |||
2. Correct the word ''develoment'' and click ''OK''. | |||
This typist's error should also corrected in the expression file. You can view it in the diagram tab at the bottom, or edit the expression file by selecting it in the Project Manager and select Text Edit from it's popup-menu. | |||
[[File:DiagramExpressions.png]] | |||
= Regenerating fact (type) expressions = | |||
1. Open the ''Run'' menu and select ''Generate Expressions'': | |||
[[File: | [[File:Regenerateexpressions.png]] | ||
2. Make sure all options are set as displayed above, then click Save. | |||
3. Enter '''...\APPRREG\APPRREG.TXT''' as the filename. | |||
4. The regenerated file will be added to the project. | |||
5. Open the File menu and select Save Project. | |||
---- | |||
Back: [[:Modeler:Tutorial/Information Grammar Diagram|Information Grammar Diagram]] | |||
Next: [[:Modeler:Tutorial/Constraints|Constraints]] | |||
[Category:Modeler] | [[Category:Modeler]] | ||
Latest revision as of 07:06, 27 November 2022
In this lesson you will learn how to change information grammars. (Using the information grammar you have created in the previous lessons).
Renaming an object/fact type
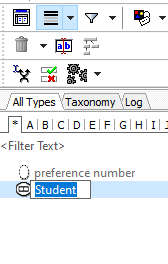
1. Click on Student in the Repository window.
2. Open Students' popup-menu and select Rename (or press F2).
3. Overwrite Student with Apprentice and press Enter.
4. Open the Edit menu and select Undo Rename Student (or press Ctrl+Z).
Removing an object/fact type
1. Click on Apprenticeship in a Diagram.
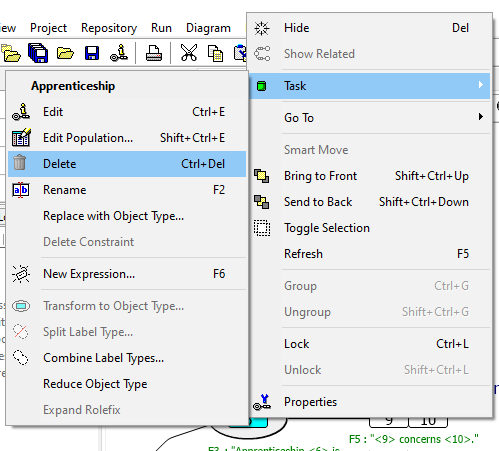
2. Select Task\Delete from it's popup-menu (do not press OK after that!):
The fact types Apprenticeship Description, Apprenticeship City, Assigned Apprenticeship and Apprenticeship Preference contain roles played by Apprenticeship. By deleting Apprenticeship these roles would become obsolete. Therefore, these fact types will be removed along with Apprenticeship. By removing these fact types the label type description becomes useless... etc. Nearly the complete information grammar would be removed.
3. Click Cancel to prevent the deletion of Apprenticeship!
A similar Delete from the IG Repository would prompt a different and more fine grained popup-menu. It'll allow you to delete a single expression either locally or the entire expression grammar, or the entire Object/Fact-Type.
Changing the properties of an object/fact type
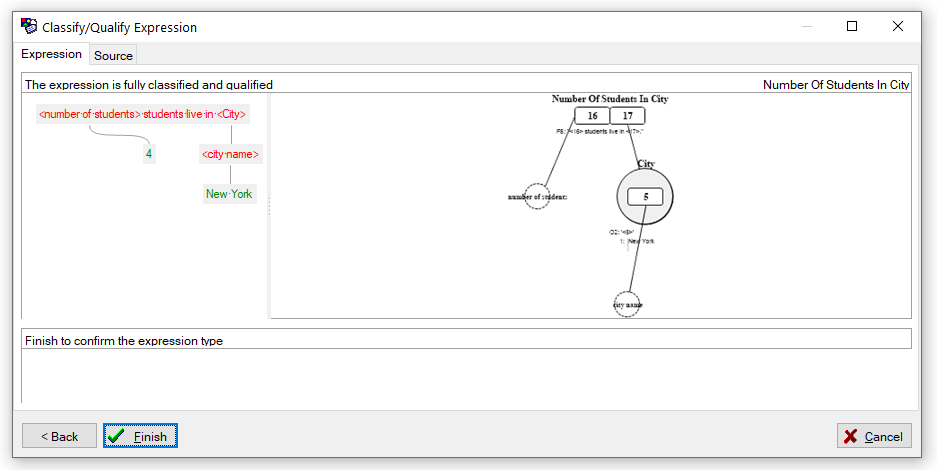
1. Classify and qualify the fact expression: 4 students live in New York as shown below:
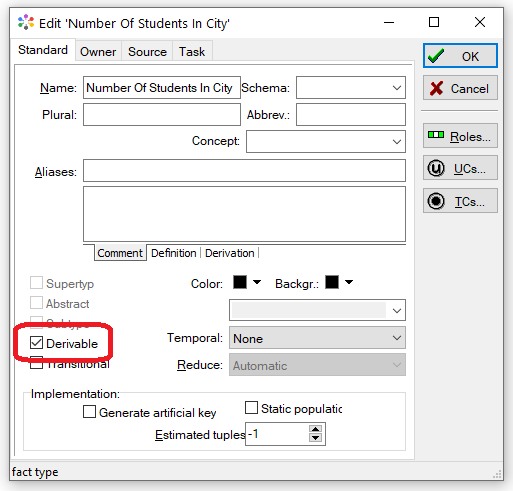
2. Select the fact type Number of students in city in the IG Repository.
3. Select Edit from its popup-menu and click Derivable: You could supply the derivation rule in the comment.
4. Click Roles:
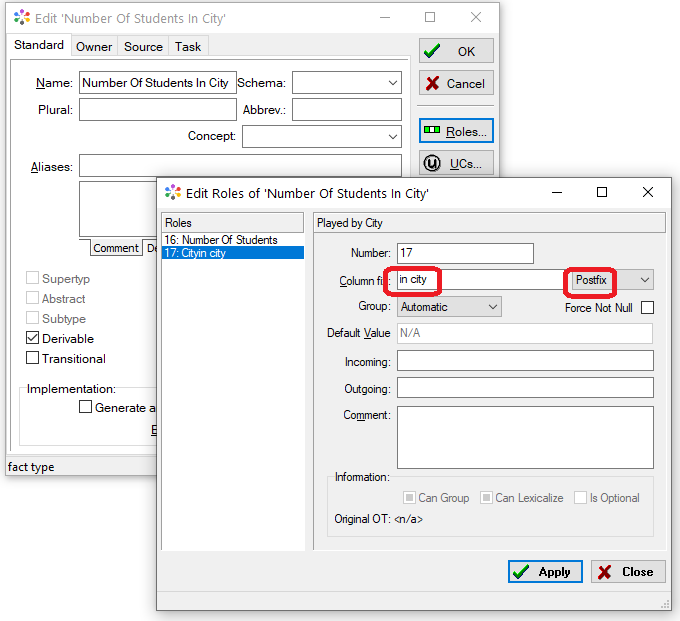
5. Select role 17.
6. Type in city in the Column Fix field.
7. Select Columnfix Type Postfix and close both windows by clicking Apply and OK.
8. Drag Number of students in city from the Repository window onto the diagram.
Note: The fact type is marked derivable with an * behind the fact type name. Role 17 has a postfix.
9. Open the Edit menu and select Undo twice. The Number of students in city should now have disappeared. If not, delete the Fact Type manually.
Changing the properties of a label type
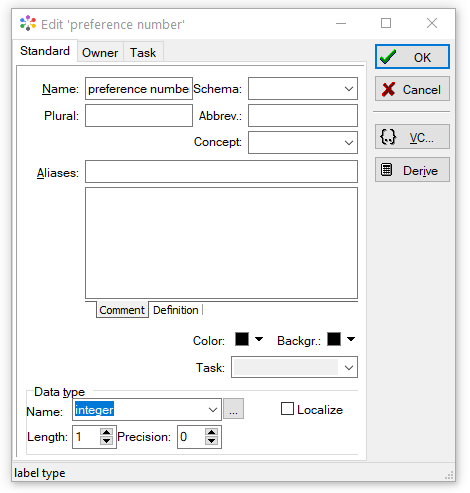
1. Doubleclick on Preference number in the Diagram. This will select it in the Repository window. Use the context menu to edit it.
2. Select Edit from it's popup-menu:
You can adjust the datatype and value constraint in this window.
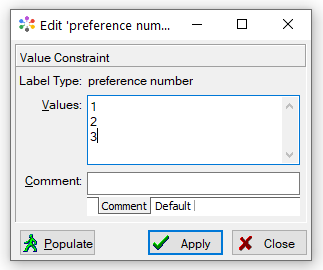
3. Click VC and enter the value constraint displayed below:
Note: Once you have a proper population the examples from this can be automatically inserted as value constraints using the populate button.
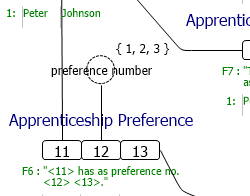
4. Click OK. The diagram should reflect the changes. If not, refresh the diagram by pressing Refresh (F5).
Reducing an object type
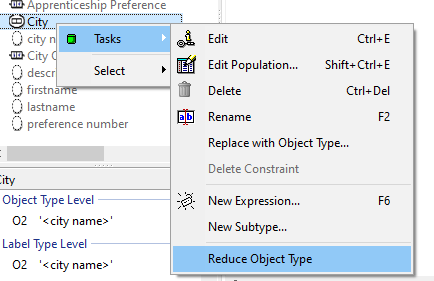
1. Click on City in the Repository window.
2. Select Reduce Object Type from it's popup-menu.
Note: Roles 4 and 8 are now played by city name and City has been removed.
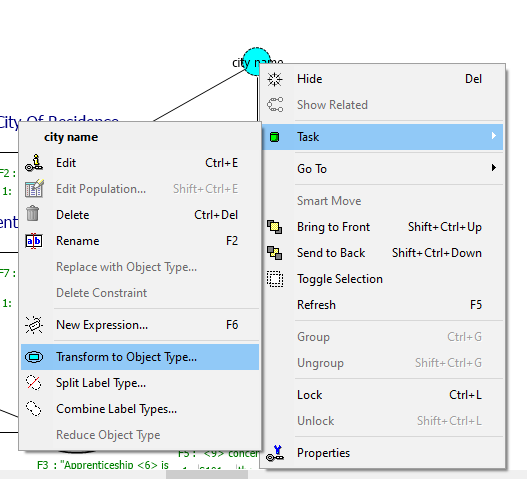
3. Click on city name in the diagram.
4. Select Task >> Transform to Object Type from city names popup-menu:
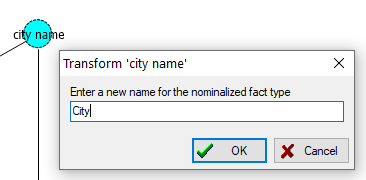
5. Enter 'City' as the new object type name:
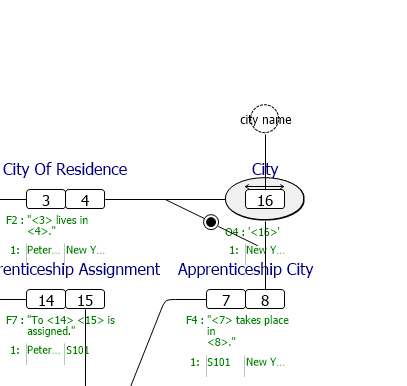
6. If not visible, drag the OT City into the diagram. The result looks like this:
Note: A totality constraint has been placed on roles 4 and 8 (black dot). A uniqueness constraint has been placed on the role of City (double arrow).
The Transform to Nominalized Fact Type option is also available from the Repository window popup-menu. If you would have chosen this option, the object 'City' would not have been placed automatically on the diagram.
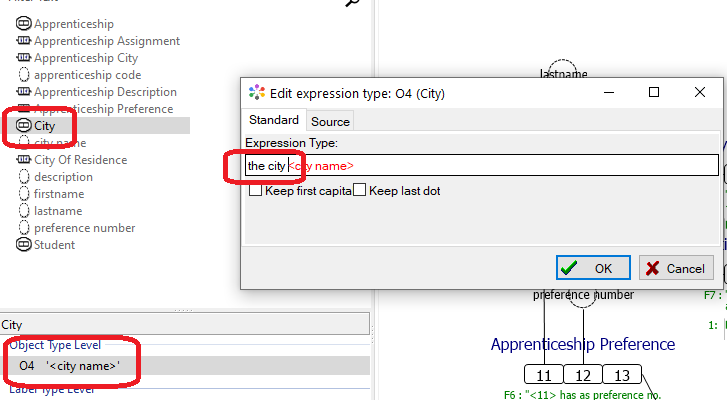
Changing an object/fact type expression
1. Make sure the right section of the Repository window is visible and the OTL tab is activated.
2. Click on City in the IG Repository.
3. Click on object type expression O4 (in the right section).
4. Select Edit from the popup-menu of O4.
5. Change O4 als shown below:
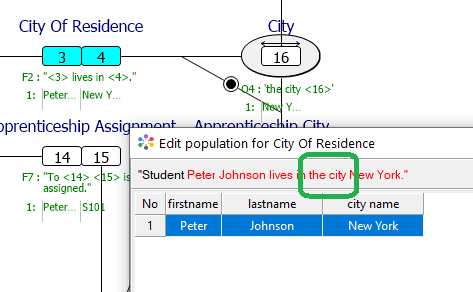
Note: All fact type expressions in which O4 is substituted will change when regenerated.
E.g.: the Fact Type City Of Residence:
Replacing an object type expression
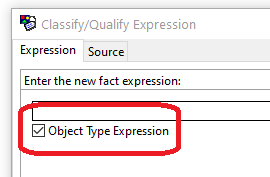
1. Open the Repository menu and select New Expression.
2. Make sure Create OTE is enabled.
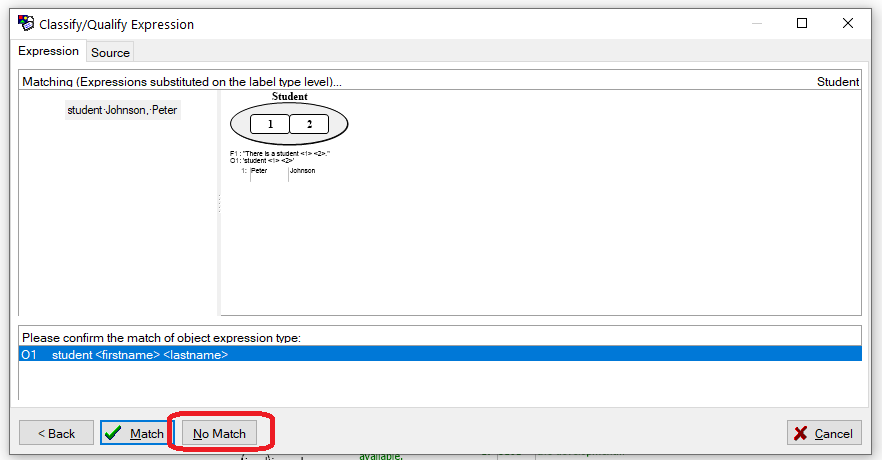
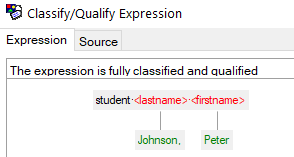
3. Enter the object expression student Johnson, Peter and qualify this expression as Student. Click No Match!
4. Classify and qualify firstname and lastname:
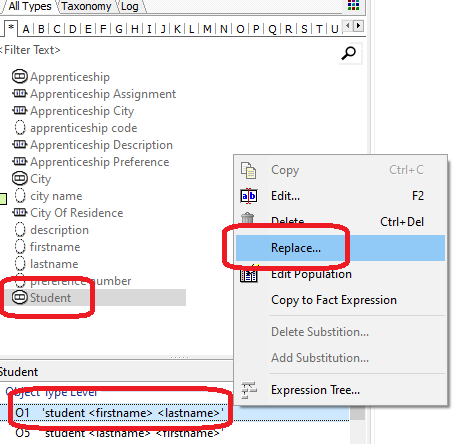
5. Click on Student in the Repository window. Click on object type expression O1 in the right section of the Repository (the Object Type Level).
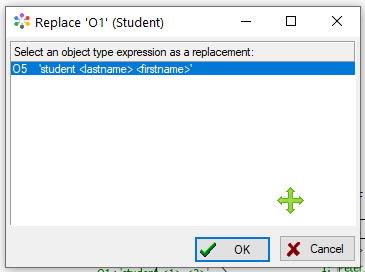
6. Select Replace from the popup-menu of O1.
Select O5 from the appearing window:
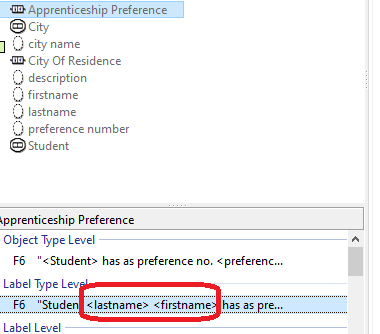
7. Verify the replacement of O1 by examining the expressions of Apprenticeship Preference at the Label Type level.
8. Open the Edit menu and select Undo Replace O1.
9. Repeat this for Undo New Expression: student Johnson, Peter.
Adding population to a fact type (expression)
1. Click on Assigned Apprenticeship in the IG Repository, then click on fact type expression F7.
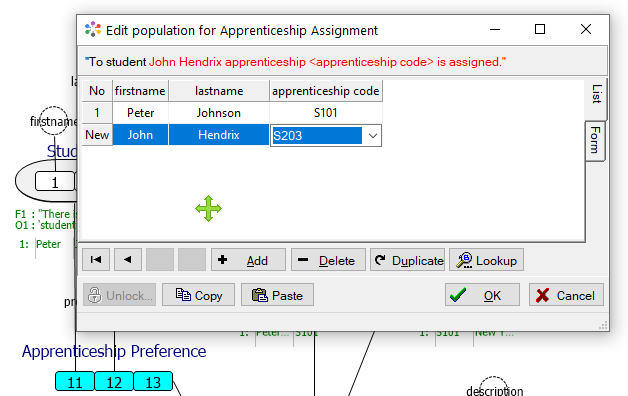
3. Select Edit Population from the popup-menu. Click Add and add the tuple shown below:
5. Click Ok.
Note: Population has been added to Student, Apprenticeship and Assigned Apprenticeship.
Using expression files
1. Open the File menu and select Open, then open the file ...\CASETALK\LESSONS\STEPS\LESSON.EXP.
2. Open the File menu and select Save Expression File as. Save the file as ...\APPRREG\APPRREG.EXP
The structure of expression files
An expression file is a text file. The first line of an expression file contains the text [EXPFILE]. After this line the names of the object type or fact type are placed between []. Below this line you will find the expressions for this object type or fact type. These lines are followed by the second object type or fact type etc. Comment lines can be added by starting the line with a ';'.
It is possible to select multiple lines of an expression file at the same time (for classification and qualification by the casetool). CaseTalk will try to classify and qualify the expressions using automatic matching if possible. As a result the user interaction will be minimized.
3. Click on the first line of the expression file. Hold the shift-key and press the end-key.
4. Click Qualify.
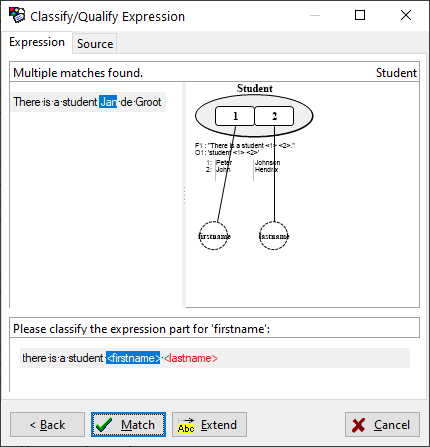
CaseTalk will start to classify and qualify the selected expressions. The automatic classification and qualification will stop at the fact expression There is a student Jan de Groot (Which is a Dutch student).
5. Click Match:
CaseTalk has stopped automatic classification and qualification because it cannot determine whether the first name is Jan or Jan de. It suggest the fact expression matches with Student:
6. Click Extend.
As a result the first name would become Jan de.
7. Click Extend again.
Now the first name will be Jan again, which is correct.
8. Click Match and Finish.
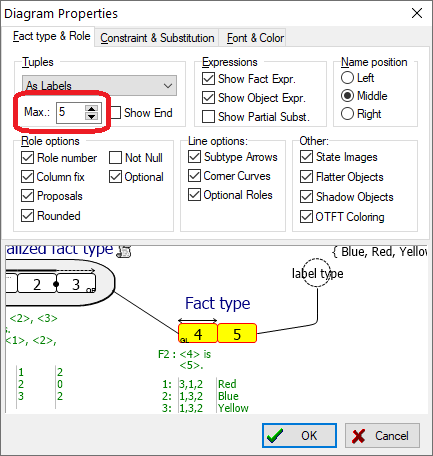
The automatic classification and qualification will continue. It will stop again for the fact expressions of Apprenticeship Preference. You can just match these expressions and continue. The diagram will now list multiple tuples for each object type / fact type.
To configure the displayed number of tuples, alter the maximum displayed in the Diagram Style Properties:
Changing the population of a fact type (expression)
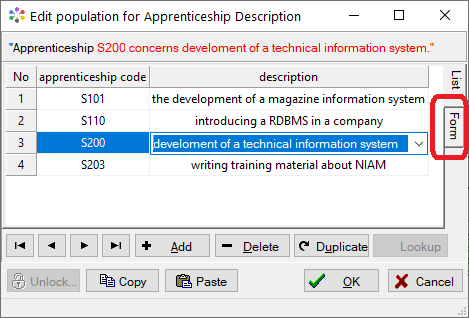
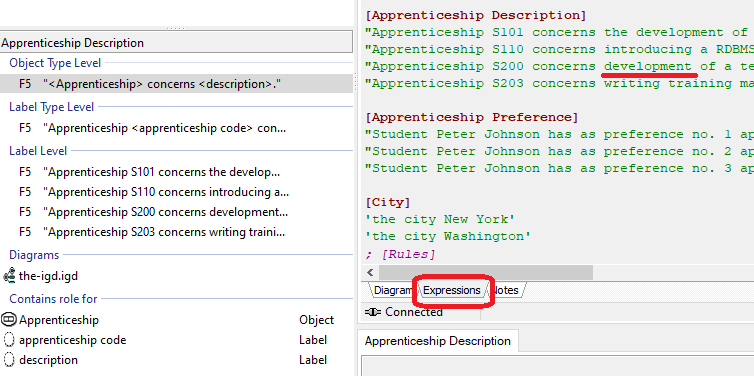
1. Click on Apprenticeship Description in the IG Repository, then click on fact type expression F5 and select Edit Population from the popup-menu. Click on the tupel with apprenticeship 'S200'. Alter the line in place, or use the Form tab to use a regular data-entry format.
2. Correct the word develoment and click OK.
This typist's error should also corrected in the expression file. You can view it in the diagram tab at the bottom, or edit the expression file by selecting it in the Project Manager and select Text Edit from it's popup-menu.
Regenerating fact (type) expressions
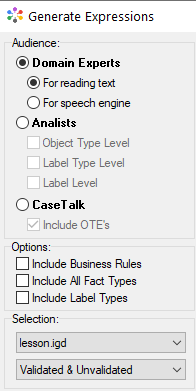
1. Open the Run menu and select Generate Expressions:
2. Make sure all options are set as displayed above, then click Save.
3. Enter ...\APPRREG\APPRREG.TXT as the filename.
4. The regenerated file will be added to the project.
5. Open the File menu and select Save Project.
Back: Information Grammar Diagram
Next: Constraints
